POA Network是一个基于以太坊的平台,为智能合约提供开源框架。POA Network是使用权威证明作为其共识机制的以太坊的侧链。POA为开发人员提供了在以太坊标准中编码的灵活性,以及POA Network解决方案在区块链网络中的可扩展性和互操作性的额外优势。
POA的交易费用与以太坊主网一样,但与以太网支付费用的以太坊主网相比,PoA区块链需要native货币(称为PoA代币)支付费用,该代币可在Binance等加密交易平台上获得。
POA目前有两个网络正在运行:
· POA Core:需要POA令牌的主网络
· POA Sokol:需要POA Sokol令牌的测试网络
出于本教程的目的,我们将使用POA Sokol网络。
步骤1:将Metamask连接到PoA Sokol并为您的帐户提供资金
在第一步中,我们将学习如何将我们的metamask钱包连接到一个名为sokol的POA测试网络,以及如何使用测试POA令牌为帐户提供资金。
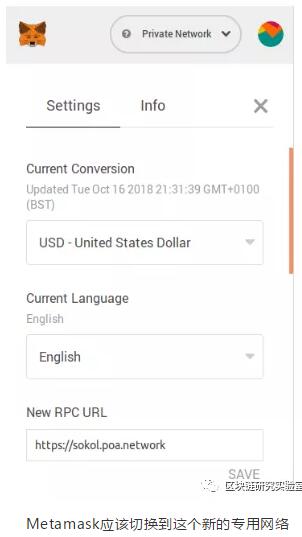
1、解锁Metamask扩展程序
2、转到“设置”,输入以下新的RPC URL https://sokol.poa.network并单击“保存”
注意:也可以使用POA的专用浏览器扩展(仅限Chrome),与Metamask非常相似:Nifty
3、在Metamask中,复制您的帐户地址
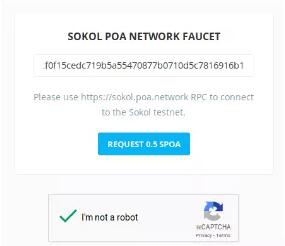
4、POA Sokol的水龙头
5、点击Request 0.5 POA
6、您可以在Metamask中查看账户余额,也可以在POA Sokol Explorer中查看交易是否通过。
步骤2:在POA Sokol网络上部署合同
第二步是编写一个非常简单的Solidity智能合约,并使用Truffle框架将其部署在POA Sokol网络上。
1、在您的电脑上安装truffle
$ npm install -g truffle
2、初始化Truffle项目
$ truffle init
Downloading...
Unpacking...
Setting up...
Unbox successful. Sweet!
Commands:
Compile: truffle compile
Migrate: truffle migrate
Test contracts: truffle test
3、现在让我们编写一个简单的智能合约,它可以递增并存储一个计数器。
在contracts/counter.sol中创建文件并粘贴以下solidity代码
pragma solidity ^0.4.20;
contract Counter {
uint counter;
constructor() public {
counter = 0; // Initialise the counter to 0
}
function increment() public {
counter++;
}
function getCounter() public view returns (uint) {
return counter;
}
}
您可以使用以下命令$ truffle compile验证您的代码是否正确编译。
4、现在,我们需要创建一个部署脚本
在migrations / 2_deploy_contracts.js中创建一个文件并粘贴以下代码
var Counter = artifacts.require("./Counter.sol");
module.exports = function(deployer) {
deployer.deploy(Counter);
};
5、最后,我们需要配置与POA Sokol网络的连接以及我们的钱包信息安装以下JavaScript依赖项:
· Truffle HDwallet Provider允许为从12个字的助记键派生的地址签署交易
· dotenv是一个配置环境变量的模块
$ npm install truffle-hdwallet-provider dotenv --save-dev
6、从Metamask钱包中复制助记符:设置/显示种子词
7、在Truffle项目中创建一个.env并复制这个助记符
MNEMONIC="COPY HERE YOUR 12 MNEMONIC WORDS YOU DO NOT WANT TO SHARE"
8、打开truffle.js文件并添加以下配置
require('dotenv').config();
const HDWalletProvider = require('truffle-hdwallet-provider');
module.exports = {
// See <http://truffleframework.com/docs/advanced/configuration>
// for more about customizing your Truffle configuration!
networks: {
poa: {
provider: function() {
return new HDWalletProvider(
process.env.MNEMONIC,
"https://sokol.poa.network")
},
network_id: 77,
gas: 500000,
gasPrice: 1000000000
},
development: {
host: "127.0.0.1",
port: 8545,
network_id: "*" // Match any network id
}
}
};
9、将部署运行到POA Sokol网络
$ truffle migrate --network poa
Using network 'poa'.
Running migration: 1_initial_migration.js
Deploying Migrations...
... 0x3a2e4be0c784bf5df3ca4251d27dc724ae5863d5de0e1eae4babb0c636b8c571
Migrations: 0xb497ad71c0168d040027cfdcf9a44c7f8f270d0d
Saving successful migration to network...
... 0x8ebbf70d5a162ba46e2fa4266aafe360d9f32e32c30ed17a083045d2afeeaf46
Saving artifacts...
Running migration: 2_deploy_contracts.js
Deploying Counter...
... 0xdf3009e60daec1217237661b4b10298b5f4504efef8a6f93cdc8198486260766
Counter: 0xfbc93e43a6a95c1cee79aa8ec2382a4edd5ad2bc
Saving artifacts...
步骤3:通过Web应用程序与智能合约交互
在下一步中,我们将使用react、web3和truffle开发一个DAPP,与先前部署在POA sokol网络上的智能合约进行交互。
1、初始化React项目
$ npx create-react-app frontend
$ cd frontend
2、安装必要的依赖项
· truffle-contract:是一个以太坊智能合约抽象库
· web3:这是与以太坊兼容的JavaScript API,它实现了通用JSON RPC规范
$ npm install truffle-contract web3 --save
3、编辑package.json并在脚本部分下添加以下行以从webapp访问Truffle合约工作
"link-contracts": "run-script-os",
"link-contracts:linux:darwin": "cd src && ln -s ../../build/contracts contracts",
"link-contracts:win32": "cd src && mklink \\D contracts ..\\..\\build\\contracts"
此文件的完整代码可在此处获得:package.json
https://github.com/gjeanmart/kauri-content/blob/master/poa_tutorial_sokol_part1/frontend/package.json
4、打开编辑src/app.js
· 使用Web3连接到节点
import Web3 from 'web3'
class App extends Component {
constructor(props) {
super(props)
if (typeof web3 != 'undefined') {
this.web3Provider = web3.currentProvider
} else {
this.web3Provider = new Web3.providers.HttpProvider('http://localhost:8545')
}
this.web3 = new Web3(this.web3Provider)
}
(...)
}
· 使用truffle-contract加载Truffle artefacts 并与智能合约交互
import TruffleContract from 'truffle-contract'
import Counter from './contracts/Counter.json'
class App extends React.Component {
constructor(props) {
super(props)
this.state = {
account: '0x0',
value: '',
loading: true
}
(... web3 ...)
}
componentDidMount() {
const counter = TruffleContract(Counter)
counter.setProvider(this.web3Provider)
this.web3.eth.getAccounts((error, accounts) => {
const account = accounts[0]
this.setState({ account})
counter.deployed().then((instance) => {
this.counter = instance
return this.counter.getCounter.call()
}).then((value) => {
return this.setState({ value: value.toNumber(), loading: false })
})
})
}
setValue(value) {
this.setState({ loading: true })
this.counter.increment({ from: this.state.account, gas: 50000 }).then((r) => {
this.setState({ value: value.toNumber(), loading: false })
})
}
(...)
}
5、创建一个指向Truffle JSON artefacts 的链接
$ npm run link-contracts:linux:darwin
6、启动Web服务器
$ npm start
7、结果展示
如果Metamask已解锁并连接到Solok网络,则web3提供程序将自动连接到节点并检索计数器值。当用户点击“increment”时,会弹出Metamask以签署交易并将其发送到POA Solok网络。

—-
编译者/作者:不详
玩币族申明:玩币族作为开放的资讯翻译/分享平台,所提供的所有资讯仅代表作者个人观点,与玩币族平台立场无关,且不构成任何投资理财建议。文章版权归原作者所有。
|